This blog is all about preparing and hiking the Kalalau Trail on Kauai.
Hiking the Kalalau trail is one of those hikes that require some background research. In my free time, I love to be out in nature and I recently hiked into Kalalau and boated out. Here ill tell you everything you need to know to be prepared for your experience. Or maybe it will help you decide if you want to do the hike or not.
Doing a little research definitely helped me feel prepared for hiking the Kalalau trail.
After reading this post I hope you will also feel a little more prepared for hiking the Kalalau trail on Kauai. I’ll also link below what products I found helpful and what I would do differently.
The 411 on Hiking the Kalalau Trail on Kauai
1. Getting Hiking Permits
This hike is 11-miles and I would not consider it a day hike. I do know people who have hiked in and out in one day. I would recommend staying at the beach for at least one to 2 nights to enjoy the beach/valley and explore it. This website has more information https://dlnr.hawaii.gov/dsp/hiking/kauai/kalalau-trail/
If you are staying overnight or hike past Hanakapai beach a permit is required. Go to this website to get a permit.
My tip: Permits can only be obtained 30 days prior and only online. Since COVID the state has really been limiting the number of permits. Their website follows Hawaii Standard Time. I recommend having whoever will be going with you be up at 12:00 am HST to get those permits. They go quick!!
2. Know the Convoy Schedule & Parking
Right now if you do not have a Hawaii State ID you may get stopped. We were early 6 am and didn’t get stopped. We got dropped off by a friend and all have Hawaii state ID’s.
Something to consider is the overnight parking situation or if you will catch a shuttle. See this website for more information. https://www.kalalautrail.com/day-use/
Do more research on this topic aside from my blog. I’m not much help I haven’t had to go through this process since I’m a Hawaii resident.
3. Planning your Stops
We had a friend who had done the hike before in one day so we felt confident it could be done. We started hiking at 7 am on the Hanakapiai Trail. The halfway point is the Honokoa campgrounds. We broke there for lunch around 1 pm and filled up water and hiked out of there around 1:45 pm. We ended up making it to Kalalau beach by 7 pm. That was with taking a few longer stops for someone in our party who had to take a few extra rest stops.
Technically people are only allowed to camp at the Honokoa campgrounds or at the Kalalau campgrounds. I highly recommend camping only at these two spots. Because on the trail there are not many spots to set up camp because of the hilly terrain.
My tip: Plan your stops accordingly and try to keep to at least an hour per mile. If you cant get started in the early morning I also know someone who started their hike at 1 pm from the Hanakapai Trail and got to Honokoa in the evening and camped there for the night. Then they made it to Kalalau the next day.
4. Packing Your Bag
This is so important because you don’t want to over or under pack. My backpack ended up being around 18-19 lbs. Some of my friend’s bags were close to 30 lbs. I really only packed the necessities. Here is what I packed on the Kalalau trail hike:
food/snacks, tent, sleeping pad, 1 towel, 1 extra pair of underwear (which I didn’t even use), 1 shorts, 1 bathing suit, 2 extra shirts (probably only needed 1), extra socks, and 1 extra pant for sleep. One headlamp, hiking sticks, small water stove plus small gas can. Grayl geopress water filter and water bladder. The toiletries I brought were reef-safe sunscreen, a toothbrush, toothpaste, flush-able wipes, and a toothpick. 2 Ziplock bags for trash.
I wore in my socks shoes a long sleeve shirt and pants, sunglasses and a hat.
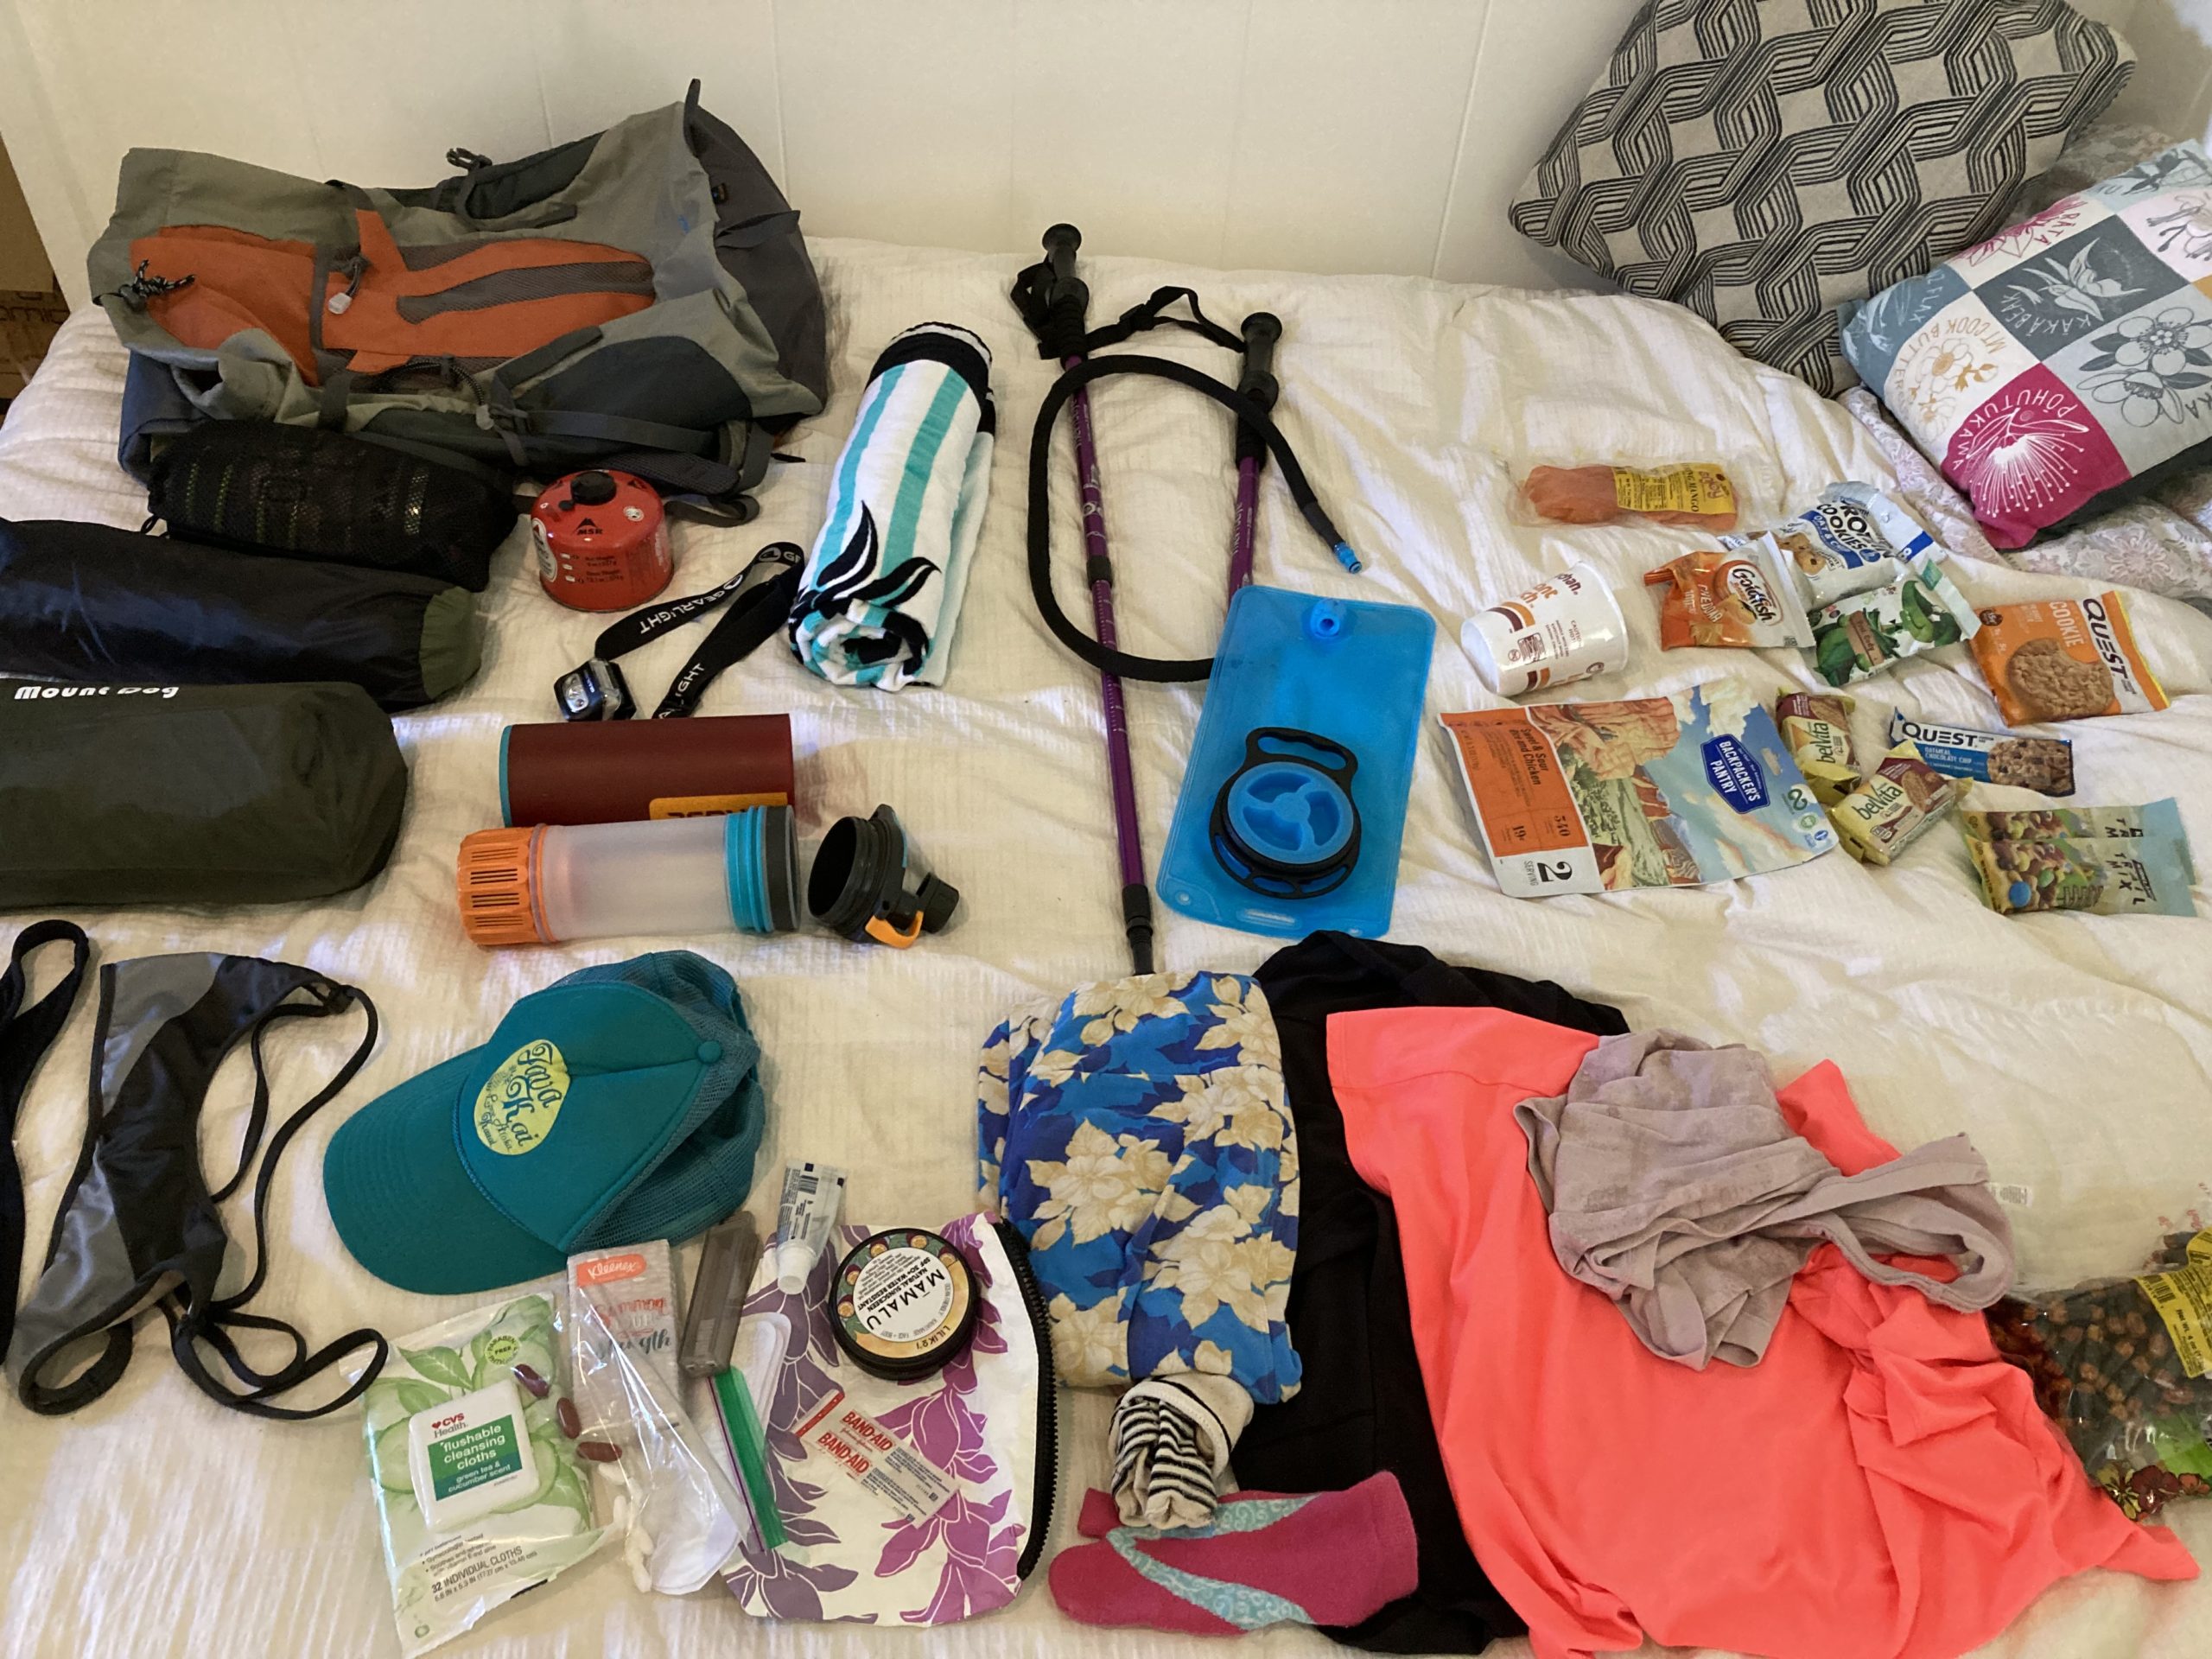
I packed more backpacking meals not pictured.
Everything we brought in we packed out. Even our used flushable wipes. I highly recommend not over-packing. If you do overpack I’d suggest overpacking on the necessities like food. You never know what may happen and if you have to stay an extra night.
5. Hiking the actual Kalalau trail
I would say this is an advanced hike, especially if you plan to hike out. The first two miles are well-traveled to Hanakapai Beach. I found my hiking sticks most helpful here. After the beach, the next 4 miles to Hanakoa campgrounds are not as heavily traveled. The trail is a bit more narrow as well with lots of bushes so it’s harder to use your hiking sticks.
We had lunch at Hanakoa. Shortly after Hanakoa is what people call a crawlers ledge. At this point, I found it safest to use one hiking stick. In my opinion crawlers ledge was not as scary as I thought it would be. It looks a lot scarier than it is. Still, be very careful and be 100% focused.
After crawlers ledge, I remember the hills we faced after that being the hardest. Because of the fatigue from the day. Once we saw red hill the hills stopped and once we reached the red hill the hike was almost over.
Overall the trail is clearly marked and easy to follow. There was one part where there was a fork in the road. Just be sure to look for signs when you see a fork. Also, when we were crossing the Kalalau stream we got a little confused about where to cross. Do not cross any streams that look dangerous like they could wash you away! Look for another spot to cross. We walked closer to the mountain and found a safe place to cross. Do not cross if the river rough and flooding wait for the rain to stop in the mountains and the river will calm down.
Remember this trail is well-traveled and if it doesn’t look like it’s a safe spot you may be on the wrong path. Also, water!! Water is something you don’t have to worry too much about. There were more than enough spots to fill up water. See my recommendations on the bottom for water filters.
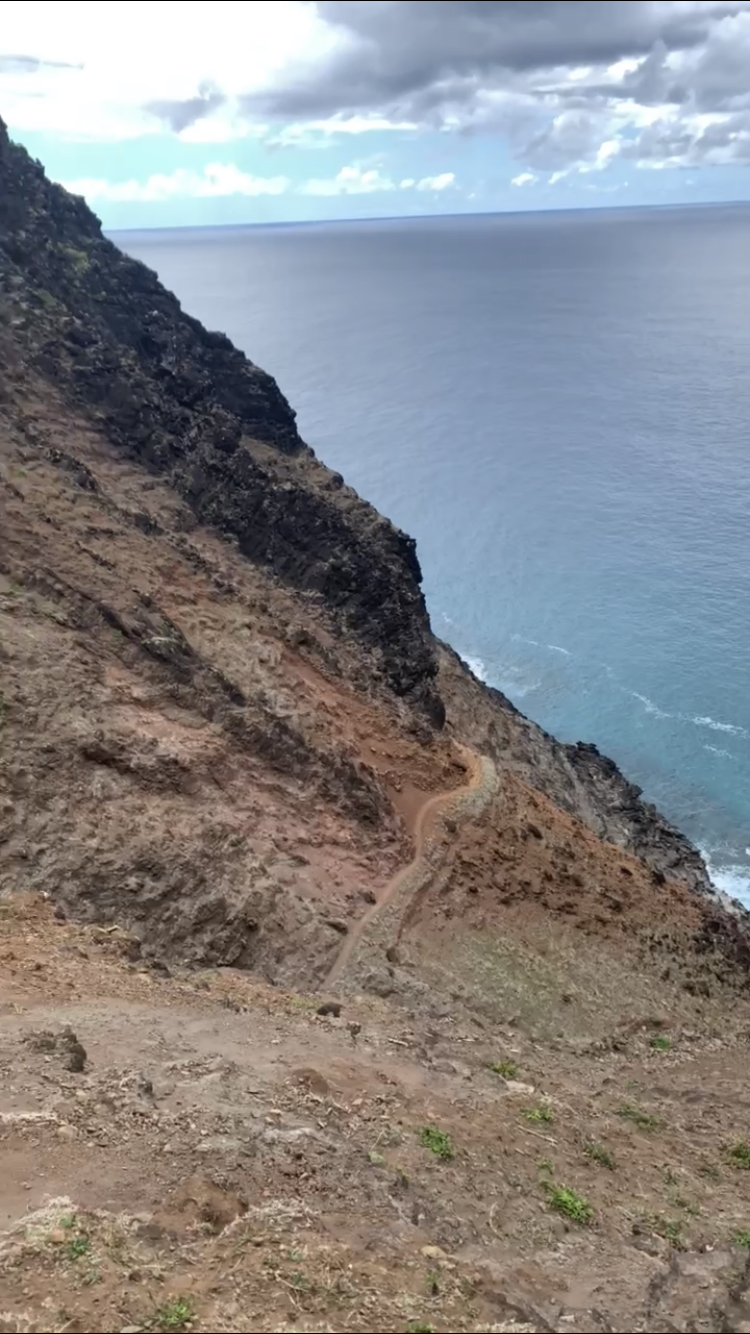
Crawlers ledge
Overall Tips & Suggestions From My Kalalau Experience
- Safety Is Priority – Dehydration is real on this hike. Be sure to take in lots of food, electrolytes, and water prior to hiking. You really don’t want to be halfway or 3/4 way through the hike with a medical emergency because there is NO cell phone reception. I have heard of some people bringing satellite phones which can connect. We did not have one.
- Bring a Variety of Food and Snacks – It helped that my friends brought different food/snacks than I did and we all shared.
- Go during the summer / dry months – It didn’t rain while we were there and that really helped. I also only used a towel as a blanket and it was enough. Every year on Kauai the rain hits us differently. Overall I would suggest going from June to September.
- Having the right gear – I highly recommend bringing lightweight gear. I’m linking all of the products that I thought were super helpful. I’m not linking all the stuff I used just those that I thought made a difference.
- Aloha Exchange shop on Kauai – This shop in Kalaheo has most items needed for this trip. If you need something last-minute stop here.
Is this hike for me?
Only you will be able to decide if you are able to make the Kalalau trail hike. It gave me confidence that a friend in similar shape had completed the hike before.
My friend and I both have babies around 1-year-old. Before this, we were both somewhat active hikers. After having kids that changes and we both did not regularly work out. Surprisingly my back felt fine after the hike. It was mainly my calves/legs and toes that were in the most pain. This was all regular pain from hiking 11 miles.
The hike is not too strenuous what makes it strenuous is carrying 15+ plus lbs.
Overall we are both averagely in shape people in our 30’s that made it. Hope this helps!
Recommended Gear Links
(Click on the blue links)
I may get a small commission if purchased through these links.
Water Filter – The Grayl Geopress
My friends brought a life straw and a water pump filter. The Grayl by far worked the best and my friends admitted so. The life straw takes too much time and the pump needed a somewhat strong water flow.
It’s so lightweight. I was totally comfortable in it. You will only be in there for sleeping. The only drawbacks are that it can only hold 1 person and you cant sit inside of it like a tent. I also sprayed mine with camp dry for extra protection in case it rained. It didn’t rain tho.
This worked great for our backpacking meals and I even brought a cup a noodle. It’s light weight and enough to heat up 2 packs of food. I bought the small gas container from Aloha Exchange in Kalaheo. One small container was more than enough for a 2 day trip.
I was so comfortable on this and it’s so easy to inflate and deflate. It even comes with a built-in pillow.
Any backpack with a hip strap will work. A hip strap is really important to take the weight off your back. Get any backpack with a hip strap. I would suggest a bag of at least 40L.
I really enjoyed this lightweight sun-protecting shirt. Its perfect for not getting sunburn.
Items I’m not really linking and why. My hiking sticks were fine except the strap was not that cushioned. The straps really rub against your hands so get a cushioned strap. Overall not a big deal. Backpacking food was another hit or miss. I couldn’t tell the difference between brands. Headlamps anything is fine. Shoes its really for your preference. I used Salomon shoes. They really have a great selection of shoes. I found that they run small.
Feel free to email me if you have any other questions about my experience hiking the Kalalau trail.